 Click to Play Video Click to Play Video |
|
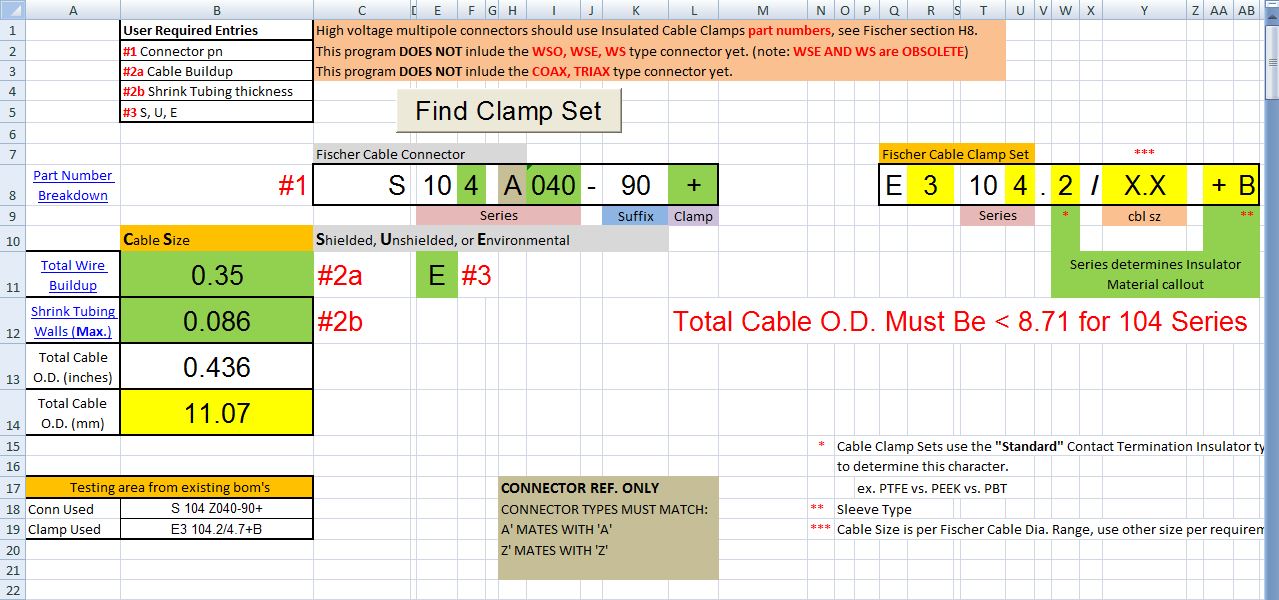
| This was similar to the Part Conversion project you see on this site where I used Excels Visual Basic, Excel Macro’s, and the Building of Buttons to make it user friendly. The difference in this project is that it wasn’t to build a description from just a part number, this helped select a mating part that was to be put on a Parts List for purchasing.Sometimes a vendors part had a long lead time for purchasing, and you can’t afford to get the part wrong, or you start from scratch again on the time wait, or pay a huge fee for special orders. This also had similar drawbacks in looking up the part number, you had to flip back and forth looking for pieces of the part number which built the purchase part number. The difference in this is that you didn’t have the part number to start with, you built the part number together by finding the different requirements needed based on the project and other parts already selected. You can click on the above link to open the graphic in a new window to follow along how the project’s needs were solved. So taking the part that it was to mate with, which drove the needs that defined what you had to look up in defining the new part number, I wrote the program based on it reading a part number, and building the new part number needed that goes with it. A few minor user entries were required that couldn’t be based off of the existing part number, like how many wires were needed defined by the project, not the first part number. The number of wires falls within a range that can fit into multiple parts, so the user had to be involved for that input calculation, but I also provided a ‘scratch pad’ so to speak that helped build that part of the part number based on that section.The user would start by entering in the existing part in the first box. Much of the second box (the new part to be generated) would auto-populate based on how the two part had to have common identifiers. You can see that I identified the procedure for the user by showing which steps to follow and in what order. Not that the program wouldn’t work unless they followed that structure, but it helps them to see it forming in a planned method. Next was the process for the user to enter the full diameter size the wires would take up including any special insulation harness required for supporting the wire assembly. Hyperlinks were provided so the user could click on them to go to a calculation table provided that also ran a formula that they could just enter the number of wires and type of insulation and it provided the diameter required for the number of wires they were using.
That diameter was converted into millimeters which the vendors part number was based on. Before that sub-total was just thrown into the new part number, my program check it to see if it fit within the range that the new part could handle. This provided a safety net for both the users calculation and the accounting department to not order a part number that didn’t exist. Defining a part number was based on total wire size, and if your calculation defines a part number, rather than just looking up an existing part number, you can order a part that doesn’t exist thinking you’ve done your homework.
So this had a safety valve checking process that warned you if your wire bundle wouldn’t fit in a range that the new part could handle, as you see on the image provided that says “Total Cable O.D. Must Be Less Than 8.71 for 104 Series”. You can see in the Yellow box on the left that the users wire size ended up being 11.07 in diameter. So the part number being generated by wire size, might have looked like a real part number, but would have been rejected by the vendor as an invalid part number. But caught here saved time and money.
Step 3 as defined by the red #3 shows the user has to define what type of environment the part will be used in. This also defines what material and insulation the new part will have. Normally the user would have to look through several pages to find how these combinations work together, but now its much more simple.
An experienced user after years of selecting similar parts can have less problems in their selection process, but can still overlook common errors. This type of tool is for anyone selecting parts, but mostly for the inexperienced user, or anyone that wants to experience fewer errors and a faster selection time.
There was even a built in area at the bottom for the user to plug in part numbers from previous jobs, or a checker going over someone’s selection process to see if they entered the right part numbers. By having part numbers in front of you, then letting the program generate its own numbers, you could see if they matched, and take action on whether the right part was ordered. Remember some vendors have long lead times on some parts, so having an extra pair of eyes look a job over is handy, and having a computer’s eyes look it over is double handy.
If your company or business can see the benefit in having a similar part number generating, error checking program, time saving process, and extra pair of eyes looking over your final checking, please contact me here and give me some small details what type of application you could use.
|
|